Sandblasting is a popular technique for removing surface materials, such as paint, rust, and grime, on a variety of materials. However, sandblasting can be a tricky and potentially hazardous process, requiring specific skills, equipment, and safety precautions. In this blog post, we’ll discuss tips and techniques for sandblasting that can help you achieve the results you want while minimizing risks.
First, let’s cover some basic sandblasting equipment and materials you’ll need. These include a sandblasting cabinet or booth (which contains the sandblasting area and prevents dust and debris from escaping), a sandblasting gun (which blasts sand or other media at high pressure), abrasive media (such as sand, glass beads, or steel shots), and a compressed air source. Safety equipment is also crucial, including respirators, eye and ear protection, and protective clothing.
Tip #1: Choose the Right Abrasive Material
The type of abrasive media you choose will depend on the material being blasted and the desired result. For example, if you’re removing rust from a metal surface, you might use steel shots or grits. If you’re cleaning a softer material, such as wood or plastic, you might use glass beads or walnut shells. Which abrasive media to choose will also depend on the surface finish you want to achieve. Fine media like glass beads will produce a smoother surface, while more coarse media like steel shots will leave a rougher finish.
Tip #2: Adjust the Sandblasting Pressure and Distance
The pressure and distance of the sandblasting gun are critical factors in achieving the desired result. If the blasting pressure is too high or the gun is held too close to the surface, you can damage the material or leave scars. Conversely, if the blasting pressure is too low or the gun is held too far away, you may not achieve the desired result. It’s important to adjust the pressure and distance based on the material being blasted and the abrasive media being used.
Tip #3: Pay Attention to the Direction of the Media Spray
When sandblasting, it’s important to pay attention to the direction of the media spray. Avoid spraying directly at corners or edges, as this can cause the material to become deformed or damaged. Instead, aim the spray at a 45-degree angle to the surface being blasted. This will help ensure that the abrasive media is evenly distributed and doesn’t become concentrated at any one point.
Tip #4: Use the Correct Nozzle Size
One of the most important factors in achieving the desired result is choosing the correct nozzle size for your sandblasting gun. The nozzle size will determine the amount of abrasive media that is being blasted and the pressure at which it is being delivered. A nozzle that is too small will cause the abrasive media to clog, reducing the blasting power, while a nozzle that is too large will waste media and result in uneven coverage.
Tip #5: Clean Between Abrasive Media Changes
If you’re switching between different abrasive media, such as switching from sand to glass beads, it’s important to thoroughly clean the sandblasting cabinet and gun between changes. This will help prevent cross-contamination of the media and ensure that you get the desired finish. Failure to clean between changes can result in a build-up of residue that can clog the media delivery system and cause inconsistent results.
Technique #1: Blasting in a circular motion
Circular blasting is a helpful technique for sandblasting surfaces with low profile and curves. To do this technique, you need to make sure that the sandblasting gun is constantly moving in a circular motion, keeping the nozzle at a steady distance away from the surface, while also applying consistent pressure.
Technique #2: Wet Sandblasting
This technique is considered one of the safest methods of sandblasting, and it’s ideal for metals that are vulnerable to heat. Wet sandblasting is done using a mixture of water, abrasive material, and compressed air. It helps in reducing the temperature of the surface, which prevents the metal from getting damaged.
Conclusion
While sandblasting can be a hazardous process, with the right equipment, materials, and techniques, you can achieve the desired results safely and efficiently. Remember to choose the right abrasive media, adjust the sandblasting pressure and distance, pay attention to the direction of the media spray, use the correct nozzle size, and clean between abrasive media changes. By following these tips and techniques, you’ll be able to tackle any sandblasting project with skill and confidence.
The Benefits of Renting Heavy Equipment for Construction Projects
In the world of construction, heavy equipment is an absolute necessity. From excavators to bulldozers, these machines can make projects easier, safer and more efficient. However, for many construction companies, owning and maintaining this equipment is simply not feasible. That’s where renting comes in as a great solution. Here are some top benefits of renting heavy equipment for your construction projects.
Cost-Effective
The cost of purchasing heavy equipment can be a huge burden for small or medium-sized companies. When you consider the high maintenance costs and storage requirements of owning your own equipment, renting becomes a more cost-effective solution. In addition, renting equipment allows you to have access to a range of different pieces of equipment within your budget. You can get the right tool for the job without having to break the bank. This is especially helpful since different jobs require different equipment to be available.
Reduced Maintenance
Heavy equipment involves a lot of maintenance, repair, and upkeep. Owning your own equipment means having to take on a great deal of responsibility – from experienced technicians in house to handling warranties and insurance policies. With a rental, however, you don’t have to deal with any of that. The rental company handles the maintenance and service of the equipment, ensuring that it is always in working order. This means you won’t have to spend additional time and resources to maintain and repair equipment that is not being used all the time.
Access to Wide Range of Equipment
Construction equipment needs vary based on the job at hand. This means that you may need to use different machines for different projects. A equipment rental company offers access to a wide range of modern and efficient equipment that you can use for any job. This includes new models with the latest features and technology, like GPS control systems. Even better, you can select the exact equipment you need for your project, so you won’t end up with something that isn’t right for the job.
Avoiding Depreciation
Equipment is an asset to any construction project, but like all assets, it depreciates over time. This means that even if you own the equipment, its value will decrease over time. Additionally, if there are newer models with better features and technology, owning older models can actually delay projects when machines break down or aren’t as efficient. By renting the equipment you need, you avoid the issue of depreciation. All you need is the machinery that you require to complete your project, with the ability to upgrade when necessary.
Seasonal Needs
There may be times when you only need a particular piece of heavy equipment for a short period, for example, during a specific season or for a one-time job. In this case, it might not make sense for your company to purchase the machine outright, considering the maintenance and storage costs associated with ownership. In these cases, renting makes a lot more sense, as it allows you to use machinery when you need it without the ongoing costs associated with owning it.
Reduced Storage Requirements
Heavy construction equipment requires a lot of storage space when it is not in use. Depending on the size of your company, you may not have enough space to store it on site, which means you have to rent additional storage space or pay for offsite storage. This can be a significant expense. With rental equipment, you don’t have to worry about storage solutions. The rental company delivers the equipment directly to your construction site, removes it when you’re done, and stores it on their own premises in between rentals.
Reduce Long-Term Risk
It is easy to underestimate the costs associated with owning and maintaining heavy equipment. Unexpected repair costs, depreciation costs, insurance, and storage costs all begin to add up. By renting, your business can take on a shorter-term commitment, without having to assume the long-term risks associated with equipment ownership. This way you only need the equipment for as long as required, and can easily make adjustments to your equipment needs when your needs change.
Conclusion
Opting to rent heavy construction equipment has various benefits, including cost savings, access to the latest models, avoiding depreciation, avoiding ongoing maintenance and storage costs, and flexibility in equipment selection. You will want to consider these advantages and at least evaluate some heavy equipment rental companies to increase your bottom line.
Scissor Lift vs. Ladder: Which One Is Best for You?
When it comes to working at heights, the decision to use a scissor lift or a ladder will depend on a variety of factors, such as the height and weight requirements, the level of mobility needed, and the type of job being performed. In this blog post, we’ll compare the pros and cons of using a scissor lift versus a ladder and help you figure out which one is best for your needs.
Scissor Lifts
Scissor lifts are a type of aerial work platform that uses a scissor mechanism to raise and lower the platform. They are often used in construction and maintenance settings, where workers need to access height while still being able to move around.
Pros
1. Greater stability: Scissor lifts are known for their stability, making them ideal for tasks that require a secure platform. They can be used in rough terrain and may even able to adjust for slight inclines.
2. Increased height accessibility: A scissor lift can offer greater accessibility to higher elevations than a ladder, while also providing a safer work environment. This is particularly useful in indoor settings, where there may be obstacles that prevent the use of a ladder.
3. Maneuverability: Scissor lifts are designed for easy movement, meaning they can be used in areas with limited space. Their platform can be raised and lowered, and they can be moved forward and backward, making work positioning a breeze.
4. Load capacity: Scissor lifts usually have a higher weight capacity, which means multiple workers or heavier equipment can be safely transported to the work area. This reduces the need for location changes, making work more efficient.
2. Technical issues: Scissor lifts require a level of technical knowledge to operate, including a certain degree of certification, which can add additional costs.
3. Time Limitations: Some scissor lifts are wired, and may require charging from time to time which can cause downtime.
Ladders
Ladders are the most common tool used when working at heights. Whether you’re a DIY enthusiast or a professional worker, a ladder is a key tool to have in your arsenal.
Pros
1. Portability: Ladders are lightweight and easy to transport, making them ideal for jobs that require mobility and flexibility. They come in various sizes and styles to suit a broad range of uses.
2. Cost effectiveness: Compared to scissor lifts, ladders are generally more affordable, making them perfect for smaller projects or smaller businesses.
3. Simplicity: Ladders are easy to use and don’t require any technical knowledge to operate. They can be moved around easily by a single person and typically require little to no maintenance.
Cons
1. Limited height: Ladders have a lower maximum height accessible compared to scissor lifts, and they may not be appropriate for working at high elevations without additional safety precautions being in place.
2. Stability: Ladders can be unstable and prone to tipping over, which can be a significant safety concern. Non-slip padding and stabilizers can be used to reduce this risk.
3. Skill Required: Although operating ladders is easy, climbing requires appropriate skill and experience. If someone does not have the right knowledge and takes unnecessary risks, it can lead to accidents.
Scissor Lift vs. Ladder: Which One is Best for You?
The decision to use a scissor lift or a ladder will, in many cases, depend on the nature of the task and the environment it is performed in. Here are some things to consider before making your decision:
1. Project size and budget: If you are working on a larger project where heights are routinely accessed, a scissor lift may be the best option. However, if you are working on a smaller job that doesn’t require heavy equipment and is on a tight budget, a ladder may suffice.
2. Maneuverability: If you’re working in an area with limited space, a scissor lift may be challenging to operate, especially if there’s a need to change positions frequently. This could make a ladder a better choice.
3. Safety: Different tasks require different safety precautions. If you’re working at great heights and dealing with heavy machinery, a scissor lift is the way to go. However, for basic maintenance tasks, a ladder may be more than effective for the job.
4. Skill: Operating a scissor lift is more complicated than using a ladder, so it requires specialized knowledge and certificates. Ladders, on the other hand, are more straightforward and do not require any special knowledge or certifications beyond basic skills.
Conclusion
Both the scissor lift and the ladder are highly useful tools for working at heights. When deciding which one to use, consider elements such as safety, budget, and ease of use. Take the time to evaluate the job requirements, and make a decision based on the available resources and the safety factors required for the task at hand. By taking these factors into consideration, you can make an informed decision and select the right tool for the job.
Whether you have a large backyard with a blank slate or a small front yard in need of some sprucing up, tackling a landscaping project on your own can be a rewarding and fulfilling experience. Not only do you get to create a beautiful outdoor space, but you can also save money by doing it yourself. However, before you dive headfirst into your DIY landscaping project, there are some helpful tips you should keep in mind. Let’s take a look.
1. Have a Plan
Before you start any DIY landscaping project, it’s important to have a plan in place. Consider how you want to use your outdoor space and what style or theme you want to go for. Additionally, determine which features you’d like to include such as hardscaping, water features, or garden beds.
When it comes to DIY landscaping projects, it can be tempting to go big and take on a major project all at once. However, starting small is often the key to success. Begin with a small project that you can complete in a weekend or two, like planting a flower bed or building a garden path. This will give you a sense of accomplishment and the motivation to tackle larger projects later on.
3. Focus on the Foundation
Just like a house, the foundation of your landscaping project is crucial to its success. Make sure to focus on the basics like good soil, proper drainage, and adequate sunlight. These factors will ensure your plants thrive and prevent problems like flooding or erosion. Remember, landscaping is a long-term investment, so take the time to get the foundation right.
4. Research, Research, Research
Before starting any DIY landscaping project, it’s important to do your research. Learn about the plants you want to use, the types of soil and lighting they require, and any potential plant diseases or pests you should be aware of. Additionally, research the tools and equipment you’ll need to complete your project safely and efficiently. YouTube videos, gardening blogs, and gardening books are all great resources to help you expand your knowledge and improve your DIY landscaping skills.
5. Think About Maintenance
As you plan your DIY landscaping project, it’s important to consider the maintenance required to keep it looking its best. Consider how much time, money, and effort you’ll need to invest in tasks like watering, pruning, and fertilizing. If you’re short on time or don’t want to invest a lot in maintenance tasks, opt for low-maintenance plants and hardscape features that require less upkeep.
6. Don’t be Afraid to Ask for Help
While DIY projects can be fulfilling to complete on your own, sometimes it’s best to ask for help. Call on friends or family who have experience with landscaping, or hire a professional landscaper for specific tasks like tree removal or hardscaping. DIY landscaping projects can be time-consuming and physically demanding, so don’t hesitate to reach out for a helping hand.
7. Be Patient
Creating a beautiful outdoor space takes time, patience, and hard work. Be prepared for setbacks, challenges, and unexpected issues that may arise during your DIY landscaping project. Don’t get discouraged if your project takes longer than expected, and be willing to make changes as you go to achieve your desired outcome. Remember, this process is about learning and growing as a DIY landscaper, so enjoy the journey and the beautiful outdoor space you’re creating.
Final Thoughts
A successful DIY landscaping project can be a great way to enhance the beauty of your home’s outdoor space while also boosting your mood and enjoyment of your property. By following these helpful tips, you’ll be well on your way to creating a stunning, low-maintenance outdoor space that you can be proud of. Remember, the key to a successful DIY landscaping project is to plan ahead, stay patient, and have fun!
Sidewalksare a critical safety element in urban, suburban and rural environments. They provide a dedicated path between street and property for pedestrians. Over time, sidewalks can become damaged and need repair. This is especially true if they’ve been exposed to water or ice for an extended period of time.
Prepare The Area
A well-maintained sidewalk goes a long way toward protecting pedestrians from falls. Sidewalks that are damaged beyond a small amount of concrete – such as hairline cracks or a half-inch or more of crumbling – should be replaced. Likewise, sidewalks that have roots that push up through the concrete and lift panels should be replaced as soon as possible. To prepare for the job, start by digging out the path to a depth of about 6 in. Widen both sides of the paint marks to leave room for forms and topsoil later.
Remove The Old Sidewalk
To properly remove the sidewalk, use a jackhammer and break apart sections of it into manageable pieces that can easily be removed without creating a safety hazard for neighbors. If you don’t have a jackhammer, a hammer and chisel can also do the trick. When you’re finished, dump the broken slab into a rented dumpster or trash receptacle.
Install The New Sidewalk
When pouring a new sidewalk, it’s best to do it when the weather is nice. Otherwise, rain can ruin the concrete and cause it to not set. Before you begin, prepare the area for your sidewalk by removing any dirt or debris. This includes slicing off sod with a sod cutter and digging out the path to a depth of 6 inches. Next, lay down 4 inches of gravel to create a solid base for the concrete. This will help the concrete hold up better in high traffic areas and keep it from moving around too much during the curing process. Once the gravel has settled, pour your concrete and fill in the forms. Level the forms on both sides and space them using a homemade gauge board-just a 1×4 that’s a few inches longer than the width of the sidewalk.
Summary
One of the most rewarding aspects of sidewalk construction is the resulting curb appeal. If your sidewalk is in good shape, it’s a surefire way to improve the quality of your property. A new sidewalk will increase the value of your home by up to 10 percent, and can add a nice touch to your landscaping plan. And as you might expect, a sidewalk replacement is no small undertaking. Fortunately, the process is relatively straightforward and should be completed in a single day with minimal disruption to your neighborhood. The only hiccups you’ll likely encounter are finding the right tools and the patience to complete the job. Thankfully, there are plenty of local contractorsready to help you get the job done, so your sidewalk will surely be back on the street in no time!

 Sandblasting: Tips and Techniques
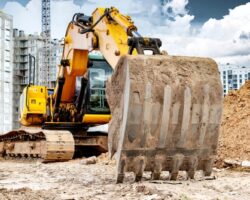 The Benefits of Renting Heavy Equipment for Construction Projects
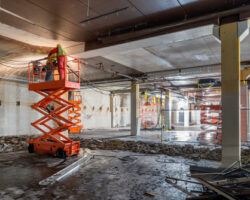 Scissor Lift vs. Ladder: Which One Is Best for You?
 Helpful Tips for Your DIY Landscaping Projects